Last updated on August 1st, 2018 at 06:26 pm
As a new WordPress user you want to be able to get things done quickly, especially if you’re starting a blog and trying to build an audience. The WordPress dashboard can be a little confusing if you’ve never used the software.

WordPress Dashboard Tour
I’ve written this walk-through tutorial to help you navigate and understand the dashboard. If you follow the step-by-step guide, you will find navigating the dashboard a breeze.
Related articles to help you with Your WordPress Blog:
- Social Warfare Plugin Why I Use It, Setup and Customization Tips
- 7 of My Favorite WordPress Plugins and Why
- Affiliate Marketing Tips That Will Increase The Conversions On Your Blog
What You Will Learn:
Logging In
Adding Elements Via Admin Bar
How to Add A Post
Creating A New Page
Adding Categories
Add Any Type of Media To Your WordPress Blog
Quickly Add A New User
Managing Comments
Changing Your WordPress Theme
Accessing the Plugin Dashboard
Working With WordPress Settings
Logging In
Login to your WordPress blog with your username and password you setup when you installed your site.

Watch Over My Shoulder
I’ll take you on the inside of a WordPress blog dashboard so you can get acquainted with it. Of course feel free to scroll down and check out my step-by-step guide with pics.
This is how the main dashboard will look.

Think of this as your navigation screen. This is where you will land every time you log into your blog.
Related: How to Login to WordPress and Change the URL
The main dashboard will give you a quick synopsis of what’s going on with your website.
[thrive_2step id=’860′]
 [/thrive_2step]
At a Glance: is a widget that provides you a quick glance of your website. It shows you how many posts, pages and comments you have.
WordPress News: provides you with updated news of whats coming or what’s new with WordPress.
Quick Draft: Use this widget to write a quick draft without having to open up your post page. I personally never use this feature.
To change the order of these widgets, just click on the widget and drag and drop it where you want it on your dashboard.
Two Ways to Add Elements
Adding Elements Via the Admin Bar
There are different ways to add elements to your WordPress blog. You can use the tabs on the left hand side of your navigation.
The second method is to look at the top at the admin bar, you will see a plus symbol with the word new.
Clicking on the word new will open up a drop down bar that will allow you to add the following elements to your website.

You can add a new post, media, page or add a new user to your website without having to use the navigation on the side.
Related: Exploring the WordPress Text Widget On Genesis
Adding Posts Via Navigation
Scroll down the navigation on the left hand side and click on add new post.

Adding Categories
Adding new categories to your posts. This makes your blog easier to manage and read. The categories will help you put everything related to that category in one spot.

The Categories tab is under the posts tab. Click on it and you can start adding them one by one to your website.
If you prefer to add them after you are done writing the content for your post, you can do that from inside of your posts.

Create your new category for the post you just wrote or put it in an existing one.
Creating A New Page
Find the “pages” tab on the navigation of your WordPress site. You can find it on the left navigation or at the top of your admin bar.

Click on the add new and start typing your page.
Adding Media
Adding pictures, videos or any type of media to your website can be done by accessing the media tab on the left hand side of your blog.

Click on the media tab to add new media, or you can access that little New tab on the top of the admin bar.
Either way both of those buttons will take you to this screen.
Click on the add new button to select and upload a file from your computer.
Adding Media Via Posts
If you’re in the middle of writing a blog post, you don’t have to leave just to add media. WordPress makes it easy to add media from inside your post.

Click on the Add media button and follow the prompts. Locate the media from your computer or use a URL to add the media to your site.
Related: Write Your First Blog Post
Adding A New User
The users tab allows you to add a new user. Click on add a new user.

This will take you to the users screen where you can enter all the necessary information to create a new user.
You can change your name, nickname, display name, contact info or if you need to change your admin password login.
Managing Comments
As your blog starts to grow you will realize that you will start to get comments. This doesn’t always mean that your blog is becoming popular.
You can quickly see if your blog has any comments.

If your site has any comments click on the comments tab and you will see what type of comments your site has.I’ve learned that my new blog got a lot of spam comments until I installed the Akismet plugin.
Related: 6 Crucial Blog Configurations
Changing Your Theme
Changing the look and feel of your website can be accomplished by just choosing a new theme. This is where you will want to upload a theme that you purchased offline.
You can change themes without logging out of your WordPress blog. Head on over to the appearance tab in your dashboard.
Let’s quickly run through all the available options.
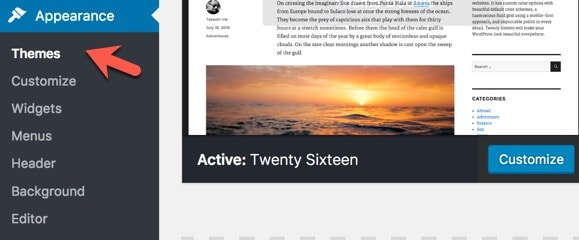
Appearance Tab Options
Themes: This is what you will click if you want to change out your existing theme. If you want to add a brand new theme you purchased online, click on add new.
Upload it and activate the theme.
Now you’ve changed the look and feel of your website.
Customize: Easily customize different elements of your theme from one spot. Depending on the theme that you are using, your design elements will vary.
Here is what you will see if you’re using the pre-installed Twenty Sixteen Theme

This is what the customizer looks like inside of the Centric Pro theme.

Click on the element that you want to change. You can add a header image, change your background image or change your website colors from this area.
The best way to learn what each tab does is to play around with all the different elements.
After making any changes via the customizer, always save your changes.
Widgets: this tab will take you to your widgets dashboard where you can add widgets to different elements of your WordPress blog. Don’t know what a widget is, read this.
Menus: Create the navigation bar with the pages you want shown at the top of your site.
Header: Add a new header image to your blog using this tab.
Background: You can change the background image without having to go to the customize tab.
Editor: This tab will take you to all the files of your current WordPress theme. This enables you to quickly and easily add CSS styles to your theme or make changes to your functions file.
Be sure you know how to restore you website if anything happens when making changes to your files.

If you want to make changes to your WordPress website, you should always do it via FTP.
Accessing The Plugins
You can easily upload delete or find new plugins to use on your website by clicking on the plugins tab. Read this to find out everything you need to know about getting started with WordPress plugins.
[thrive_2step id=’860′]
[/thrive_2step]
Changing Settings
This is where your main settings for your website are. Let’s walk through them step-by-step to make sure that you know where they are and how to change them.

General Tab: This is the section where you will setup the Site Title, tagline and etc . Start from the top to the bottom and fill in all the necessary information.
The one thing that I recommend is changing the timezone to your correct time. This is what you will see on a brand new installation.

WordPress allows you to change your current timezone. You can choose your city or you can change it via the UTC time.
Writing: I usually leave this as the default settings.
Reading: Control how your blog is displayed to your visitors.
What page do you want to use for your front page? Do you want your site to show the blogs?
Discussion: You can easily setup the discussion settings for your blog. Read through all the different settings you can choose and decide how you want your blog to be setup.

Media: This page allows you to setup image sizes for the media on your sites. Enter the dimensions in the proper spaces and hit save changes.

Enter the dimensions that you want your images to show up on your website. Don’t forget to save your changes.
Permalinks: This is where you change how you want your links to show up on the search engines. As you can see my blog is setup to show the post name at the end of the URL.

This is how I have mine setup. Feel free to set yours up exactly like I do.
We’ve Completed The Tour
Hopefully, this tour of the WordPress dashboard helped you understand how to use the back office. If you learn the basics, you can figure out the other stuff as you continue working with WordPress.
I’ve written an article on things to do after installing WordPress. It will help you get a better understanding of what needs to be done before publishing content on your blog.
The Take Away
The WordPress dashboard can be a little confusing at the beginning. Hopefully, I’ve made it less confusing and helped you realize that you don’t need to be an expert to get started using it.
I’ve taken you through the basics the back office. Feel free to browse around and play with the different elements to become more familiar with the things you can do.
Hand Picked Articles for You
- How to Remove Pins From Pinterest That Have Been Stolen
- How to Set Up Google Analytics In Genesis WordPress Theme
- Affiliate Marketing Tips That Will Increase the Conversions On Your Blog
The main thing you need to focus on is starting your WordPress blog and growing your business.

Great explainer post. I know those screenshots will have taken some time to do!
Hi Claire,
Welcome to my website. Glad you liked the post.
Yes it does take a while to create theme with the screenshots. But I am a visual learner and I think that people will find them more helpful because of the pictures.
Thanks for taking the time to comment, have a great day!
Susan
I’m getting ready to put together my first blog. I’ve been apprehensive for awhile because it seems like they’re is so much that goes into it, just even on the technical side. You have a lot of good info on here. I think I’ll be visiting your page and channel quite often here in the near future. Thanks for putting all of this together!
Hi Tif,
Congrats on making the choice to start your blog. It is a lot of hard work, but so rewarding.
I am so happy that you have found my blog helpful. When you get your blog setup, let me know and I’ll check it out.
Thanks for taking the time to stop by and comment.
Have a great day 🙂
Susan