Last updated on August 16th, 2018 at 08:16 am
Working with WordPress widgets is not as hard as you might think. You will realize that the WordPress text widget can make your life easier and will help you get things done quickly.

In this tutorial we will be discussing the Genesis text widgets and a step-by-step process of how to start using them.
Adding, Videos, Images, & Text to The Text Widget
What Is A Widget On WordPress?
A WordPress widget is nothing more than a small block that performs a specific function. All themes come with widget-ready areas, that allow you to start using.
What Is The Use of Widgets in WordPress?
Many people use them on their WordPress sidebar. Once they add it to the sidebar, they can add:
- Shortcode in widget
- Insert text in HTML
- Affiliate links
- Add text
You can add pretty much whatever you want without having to install another plugin.
Don’t confuse a widget with a WordPress plugin. Read this guide on WordPress plugins if you’re confused.
To start using the text widgets, you just drag and drop the block into the specific widget area.
These widget areas can be found in the header, footer, sidebar and below content. The available widgets you can have access to will depend on the theme you are using.
Related: Setup The Genesis Author Box
WordPress Text Widget Video Walkthrough
Watch the video to see how the text widgets work. Of course, yours will look different depending on the WordPress theme the you are using.
Available Widgets In Genesis Theme
Before we begin talking about the text editor, I thought I would show you how many available widgets there are in the Genesis Theme compared to the Twenty-Seventeen theme.

The Genesis theme gives you access to several more widgets.
Since I am using the Genesis Framework for my blog, this tutorial will be based off of the Genesis theme.
However, working with widgets will be the same regardless of which theme you are using. You just may not see as many available widgets in your theme.
When you log into your blog’s dashboard, go to Appearance > > Widgets.
Working With WordPress Widgets
Before you get started working with the widgets, you first have to decide what you want to use them for. If you’re not sure how to use them, browse some other sites and see how they are using widgets in WordPress.
You’ll notice that everyone uses them differently. I’ve also seen some blogs that don’t use them at all. I’m not really sure how that happens?
Even if I wasn’t using the WordPress sidebar, you’ll notice that I still use them in the footer.
In this tutorial, I am going to be walking you through the process of adding YouTube videos, images, text, HTML and shortcode to your widgets.
So follow along and see how easy it is to add these elements to your widgets.
Adding, Videos, Images, & Text to The Text Widget
How To Add Video To A Sidebar Widget
Step 1: Grab Your YouTube Code
In order to do this, go to YouTube and grab the code. You do this by going to YouTube and then:
Click on Share >> Embed
You may have to play around with the size in order to get the video to fit on your sidebar.
Copy the code head on over to your widgets HTML text on YOUbox.
Step 2: Place The Widget In The Sidebar
We are going to be placing the video in the sidebar.
In order to accomplish this, we need to use the Text widget. Click on the widget and you will see.

We will be adding the widget to the sidebar, however you can see that you have several different options you can place the widget.
Choose sidebar and click on “Add Widget.”
Step 3: Place YouTube Code in Widget
Place that YouTube code in the widget-area. Click on Save and now you should see your video on your sidebar.

See how easy that was. If the video does not fit properly, keep playing with the dimensions on YouTube till you get it to look properly. The cool thing is that you can quickly and easily embed codes into your widgets.
Adding Images to Your Sidebar
Maybe you want to add an image to your sidebar. The Process is just as easy as adding a video.
Step 1: Upload Your Image to the Media Gallery
Go to Media >> Add New
Browse for the image on your computer and upload it to the media gallery.

Step 2: Grab the Image URL
Once you upload the image, you will see the option to click edit.
Highlight and copy the File URL link. This is the link we will be using to place the image in our sidebar.
Step 3: Use Image Source Code To Place Image
Go back to your widgets and place the link of your image using the image source code, it will look like this.

Now when you visit your blog, you should see the image you just placed. If you don’t see it, refresh it or clear your cache.
If you still don’t see it, you may want to recheck your image source code.
Add Simple Text to Your Text Widget
To add any type of plain text to your sidebar, you will be using the text widget.
Step 1: Place The Text Widget In Sidebar
Just like we’ve been doing drag and drop the text editor to your sidebar.
Step 2: Place Your Text In The Widget
Open your text widget and place your text inside of of it. If you want to give it a title, then place the title at the top.

Click Save and your text will now show up on your sidebar.
Adding Shortcode and HTML to The Sidebar
How to Add Shortcode In The Text Widget
For this tutorial I will be adding Gravity Forms shortcode to my development site.
Step 1: Add A Code Snippet to Your Functions.php
Open up your Functions.php file and place this snippet of code in your child theme.
Save your changes and then refresh your blog. You should now be able to see the shortcode that you placed in your sidebar.
Step 2: Place The Shortcode In Your Widget
Place the shortcode in your text widget and click save.
add_filter(‘widget_text’, ‘do_shortcode’);
That’s all there is to adding shortcode to your sidebar.
This is what my contact form looks like on my site.

Adding HTML to Your Widgets
Step One: Drag and Drop the Text Widget to Your Sidebar
Just like we’ve been doing we are dragging the text widget to the sidebar.
Step 2: Place the HTML Code
Open up your text widget and place your HTML code inside.
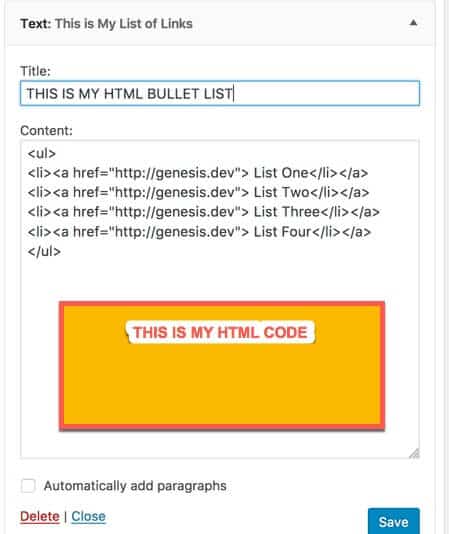
Click save and this will create a bullet list on my sidebar.
You can see how it looks by visiting your blog.

That is how easy it is to add different elements to your sidebar using the text widget.
Rearranging The Widgets
Depending on the order of the widgets is how your elements will show up on your sidebar.
To rearrange the order, all you have to do is move the element above a different element.

They will show up on your side according to the position.
The top widget always shows up first.
Deleting A Widget
If you no longer want a widget to show up, you have 2 options.
Option 1: Drag it to the In active widgets
This removes them from your sidebar but will keep their settings, in case you ever decide to use the widget again.

Option 2: Delete It
If you want to delete the widget completely, open it up and click delete.
The widget will be deleted completely.
Creating a Widget Title
If you have a lot of widgets on your sidebar, then you’ll definitely want to make sure that you add a title to it. Otherwise your sidebar will look cluttered and no one will know what you’re doing.
From my personal experience, I don’t get a ton of click throughs on the affiliate links on my sidebar. That’s why you don’t see that many of them there.
I’d recommend using the Advanced Ads Plugin to add items to your sidebar without having to mess around with any widget code.
Related: Advanced Ads Review WalkThru and Setting Up First Adsense Ad
Genesis Quick Links
Once you become a Genesis user, it’s important to know how to find the help you need quickly. I’ve put together this list to help you find everything you need quickly.
A Beginner’s Guide: This guide will help you learn the ins and outs of using the Genesis framework. The best part is that it’s free.
Child Themes: Take your time and browse all the available child themes you can choose from. If you’re buying an individual theme, you won’t get access to all their themes.
StudioPress Pro Plus All-Theme Package: You understand that your blog is your business. It’s important for you to have access to over 90 child themes you can use in your business without paying another penny.
Genesis Features: Read through all the features before you make a buying decision. There’s nothing wrong with taking your time to do some research before you make a buying decision.
Visual Hooks Guide: Visually see the hooks in your Genesis theme. (this is for the advanced users or people who want to get more indepth with Genesis)
Genesis Specific Plugins: Created by StudioPress specifically for Genesis. I have used Genesis Simple edits (need to know how to work with plugins)
StudioPress Sites: Use this to get free migration to their managed WordPress hosting.
StudioPress Forums: Need help with a specific child them? Don’t hesitate to ask for help in the forums. I’ve used the forums to get answers to several of my questions.
Become a StudioPress affiliate: Love Genesis so much, make money any time someone uses your link to purchase Genesis.
Final Take Away
You can see how easy WordPress makes it to add elements to your sidebar. You can add almost any element that you want to your sidebar using the widgets.
WordPress sites require a little bit of a learning curve. However, when you see how much flexibility you have when it comes to using themes and plugins of your choice. I have no doubt you’ll love it.
Hand Picked Articles for You
- Understanding the WordPress Dashboard Let Me Show You Around
- Struggling to Learn The Basics of WordPress How to Overcome It
- What Is A WordPress Plugin The Complete Beginners Guide
What are you going to add to your sidebar? Let me know in the comments below what’s the most common thing you add in your sidebar.
