Last updated on July 24th, 2018 at 06:54 am
No blogger wants to spend time dealing with 404 errors or crawl errors. However, it’s important to learn how to fix errors in Google Webmasters Tools also known as Google Search Console so you can stay on Google’s good side.

I’m not going to go into what types of issues you can face from the wrath of Google if you choose to ignore these errors. Because the truth is, I have no clue what can happen.
Here’s a great article if you want to read about the negative effects of these crawl errors.
I’ve heard people say that when you ignore these errors it can have a negative effect on your blog’s rankings. If you want to learn how to start a successful blog, it’s important to learn how to take care of it.
Unfortunately, this means that you’re going to have to learn how to fix errors in Google Search Console.
Don’t worry, my step-by-step tutorial will make it easy when you notice that your blog has some crawl errors.
>> READ MY GUIDE ON HOW TO START A BLOG <<
How to Find Crawl Errors
I used to log into my Google Search Console dashboard whenever I thought about it. To tell you the truth that wasn’t very often.
For some reason, I just never think about logging into my Google Search Console. It’s not as exciting for me as my Google Analytics account.
If you still haven’t installed Google Analytics, here’s a great tutorial that will show you how to get it installed on your blog.
I went months without paying attention to my crawl errors. That was until I found out about Cyfe. This all in one dashboard helps me stay informed of the crawl errors on my blog.

The Cyfe Dashboard does a lot more than informing me of crawl errors on my blog. It’s an amazing tool that helps me keep track of my blog.
Today, I won’t be going into everything that the Cyfe app does. I am just going to show you how to fix these errors so you don’t fall victim to Google.
If you’re not using the Cyfe dashboard, then you will have to make sure that you are logging into your Google Search Console at least once a month to check your errors.
How to Fix Errors In Google Webmasters Tools
Let’s log into your Google Search Console and fix these errors. If you tackle them when you notice them, you’ll have to spend less time fixing them.
Log Into Your Google Search Console
Once you’re in your account you will want to choose your domain. I am assuming that you have already added your domain to the Google Search Console. If not then read this.
You can also purchase my JumpStart WordPress guide to show you the exact steps to set up a great foundation for your WordPress blog. You can purchase it here.
Finding Your Errors
Go to Crawl and Crawl Errors
This will bring up all your crawl errors that your site is experiencing. Take a look at all the errors that I got before I even realized I had any.

Now it’s time to fix these errors one by one. Unfortunately, I don’t know of any other way than fixing these errors one by one.
The reason that I have so many errors on my blog is that I have changed permalinks and category names without adding 301 redirects.
As your blog grows you will probably find yourself deleting or adding categories. You may even delete blog posts as you realize they don’t make sense on your blog.
Unfortunately, most bloggers will have to deal with crawl errors on their blog. It’s not a big deal and these crawl errors are easy to fix.
Installing A Free Plugin
I currently use the Premium version of the Yoast SEO Plugin and it has a built-in 301 redirect feature. If you’re not using the premium version of the plugin.
I recommend installing the Simple 301 Redirect plugin. This plugin will help you set up redirects for the links that are showing up as not found.
Fixing Your Crawl Errors
Go to Crawl and Crawl Errors
All your errors will show up on this page. If you do not see any errors, that’s awesome, you can continue working on growing your blog.
If you do have errors, then follow me as I show you how I fixed mine.
Fetch As Google
One of the first things I do is I will click on Fetch as Google. This will show you what Google is seeing when they crawl that link.
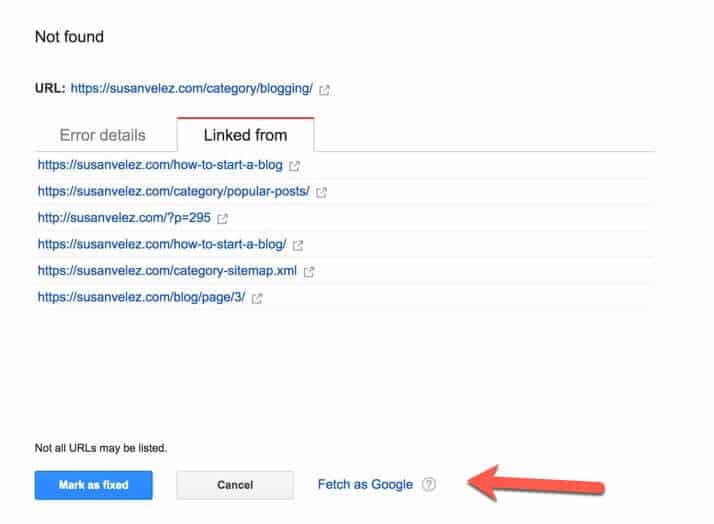
You will probably see your 404 page. This is what Google is seeing when it crawls that link.
Setting Up 301 Redirects
One of the easiest ways to fix all these links is to set up redirects. This will redirect the current link and redirect it to the proper working link so you won’t get a 404 error.
I’ve personally noticed that as my blog continues to grow. I am getting these errors more often. That’s why I think it’s important to check your Google Search Console warnings at least 30-60 days to make sure that you do not have any errors.
Fixing 404 Redirects
Log into your blog and head on over to your settings tab >> 301 Redirects.
This is where you will be adding your redirects for all the links that are showing up in your Google Webmasters tools.

Go through each one individually until you have gone through all the errors.
Enter the link that Google is showing up as crawl issues into the Request text field.
In the destination text field, enter the link that you want people redirected to when they click on the request link.
Once you have done that, make sure that you save the changes. Now you have added a new redirect on for your blog and this will take care of those crawl issues.
Mark As Fixed
After you have added the link as a redirect to your blog, mark it as fixed.

You’ll get a notification saying that it’s been marked as fixed but they may reappear later if the problem hasn’t actually been resolved.

I’ve been pretty fortunate because when I fix these errors, I usually don’t see the error again. However, I still make it a point to check back in about a week after making these changes.
Don’t Ignore These Issues
If you’ve never fixed your Google Search Console crawl errors, it may seem a little daunting at first. You might even be tempted to avoid fixing these types of errors.
However, growing a successful blog depends on you taking care of these types of issues. Well, of course, you can outsource your WordPress maintenance tasks to iMark Interactive where they will take care of these issues for you.
Most new bloggers do not have the funds to start outsourcing. Instead, we do everything for our blogs at the beginning.
Once we start to make some profits from our blogs, we then decide to start outsourcing these types of issues.
Once the Errors Are Fixed
You can continue working on growing your blog and writing content. Growing a blog is hard and I know you don’t want to spend a lot of time on fixing issues.
The great thing is that if you stay on top of these errors and fix them as soon as you see them, you won’t have to worry about spending a lot of time on these things.
I recommend signing up for a free Cyfe account to monitor your errors. You will be alerted without you having to log into your Google Search Console account.
Final Take Away
As new bloggers, we find ourselves having to take care of everything when it comes to our blog. We work on the content, videos, products, monetization, errors and etc.
The list of tasks that we have to do is never-ending. It’s so easy to forget about these small errors that can cause us to get on the bad side of Google.
Don’t forget to learn how to fix errors in Google Webmasters Tools on a regular basis. Add it to your bloggers to-do list and check your errors at least once per month.
You don’t need to check these errors everyday. Just make it a point ot do it once a month and you’ll be fine.
If you’re fixing these errors on a regular basis, you won’t have to worry about it. Your blog will grow with time.
Hand Picked Articles for You
- WordPress Maintenance Tasks Routine Check Ups
- Ultimate Guide to Google Analytics for Beginners
- 7 Best Free Plugins That Will Make Your Blog Successful
Do you take care of your own blog errors? How often do you find yourself logging into your Google Search Console to fix these errors? Let me know, I’d love to know.

Hi Susan,
Thank you SO much for putting this together for us! I’ve always wanted to learn how to do this but I could never find the time to look for a tutorial to help me. 🙂
I’ve made some changes to categories and deleted old blog posts. I use the Simple Redirects plugin as well. I normally keep up with adding a repurposed blog post with a new link but there have been some blog posts I missed so I’m sure I have some crawl errors I need to tend to.
This is going in my to-do list this weekend for sure. 🙂
Thank you again for such a great tutorial!
Have a great day and rest of the week!
Cori
Hi Cori,
Glad you found it helpful.
I had a lot of broken links as well as I changed up my old categories.
Thankfully they are all fixed now.
Good luck with cleaning up yours and appreciate you taking the time to share.
Have a great day 🙂
Susan