Last updated on August 1st, 2018 at 06:22 pm
In the last tutorial we edited our footer credits in WordPress. If you missed that tutorial, you can check it out here. Today we’re going to be talking about styling your WordPress footer credits.
However, before you can style your WordPress footer credits on the Centric Pro Theme, you need to first create your copyright info. (we won’t be creating the copyright information in this tutorial)

If you struggle with CSS or don’t like doing it because it takes forever, I’m here to make your life easier. When I first started with CSS, it took me forever to learn how to use it effectively. To this day, I’m pretty good with it. While I’m not the best, I am able to get things done and make small changes to my blog. I wanted to share how I’ve used CSS to make changes to my blog.
What You Will Learn
- How to Download the Google Chrome Extension and Why You Should
- Why You Need To Learn The Basics Of CSS
- How to Style the Elements On Your Footer Credits Using CSS
- Watch Over My Shoulder As I Style My Site Footer
- How to Find the Elements You Want To Change
- What The CSS Classes We’re Using To Style The Elements
- Quick Reference Links for Genesis Users
Once you’ve created your copyright info, then we can start the customizing it to your liking.
[thrive_2step id=’860′]
 [/thrive_2step]
In this tutorial we are going to style your WordPress footer on the Genesis child theme. I am going to walk you through step-by-step and we will be using CSS.
If you don’t feel comfortable or need to know about CSS, read this. Follow along and let me show you exactly how I style my footer credits on my Genesis child theme. I am using the Centric Pro child theme.
[clickToTweet tweet=”Learn to manage your blog, skills to make money. #WordPress #freetraining at susanvelez.com ” quote=”Learn to manage your blog, skills to make money. #WordPress #freetraining at susanvelez.com ” theme=”style4″]
Download the Google Chrome Web Development Extension
Before we get started, you will need to download the Chrome Web Developer extension. This extension is awesome for DIY bloggers. It will help you locate and find the class element we will need to style the footer credits.
Once you’ve installed the Web Developer extension, you may want to download this extension. Both these plugins will help speed up things when you are designing your blog.
Those are the only free tools that you will need to follow along with my tutorials. So now it’s time to fancy up our footer credits.
[clickToTweet tweet=”Learn to manage your blog, skills to make money. #WordPress #freetraining at susanvelez.com ” quote=”Learn to manage your blog, skills to make money. #WordPress #freetraining at susanvelez.com ” theme=”style4″]
Why You Should Learn the Basics of CSS
I know that there are plugins that you can use to accomplish this, in fact, the Themeover plugin works very well. I’m a true believer that these basic skills can help you if you’re trying to manage your own blog
Imagine what you can do with your newfound skills. You can apply for a new job (if you’re looking for a new one) You can even use your newfound skills to manage and grow your own blog.
I am a true believer that if you want something done, you get it done yourself. That’s why I am creating these tutorials, I want to help you start, manage or build your online business by helping you create your own blog.
Plus once you follow along with me, you will have learned how to style your WordPress footer credits on the Genesis Child Theme without paying anyone.
I know you’re going to feel awesome after you get yours looking the way you want. Of course if you’re ready to start outsourcing, you may want to know which WordPress expert can help you.
So let’s get busy…
Style Your WordPress Footer Credits On The Centric Pro Theme
In the last tutorial, I walked you through step-by-step on how to edit your copyright footer credits on the Centric Pro theme. Be sure and read that tutorial if you want to follow along and change them.
Depending on the color of your WordPress blog, you may want to style your footer credits to match the rest of the links on your page. Maybe you want to be different and use make your footer credits stand out in bright colors.
That’s the great thing about a self-hosted blog, we can do anything we want with it. As long as you’re willing to get a little dirty and play in some code.
If you’d rather watch a video instead of reading the rest of the tutorial, I’ve created one that will show you exactly how I styled the code.
Below the video, you will find all the necessary code to use on the Centric Pro child theme.
Video Walkthrough of Styling Your WordPress Footer On Genesis Child Theme
Sometimes it’s just easier to show you how I was able to do something than try to explain it. Watch over my shoulder as I show you how to style the footer credits.
If you don’t like video, I’ve done my best to create a step-by-step tutorial that walks you through the process with pictures.
Access Your Child Theme CSS Stylesheet
For this tutorial, we will be adding the CSS to our stylesheet by accessing our WordPress files via FTP.
Now let’s find the class element we will need to style or footer text links. Open your WordPress blog in Chrome because we will be using the Chrome extension we downloaded earlier.
Once you have your blog open, it’s time to start inspecting the element so we can customize it to our liking.
Place your cursor on your default copyright link at the bottom of your footer. Right click on it and you will see this.
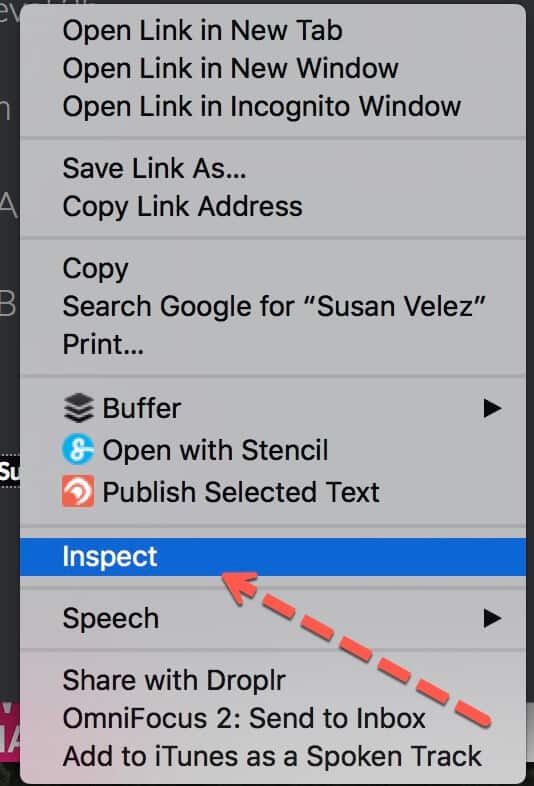
Click on inspect.
As soon as you click on inspect this will popup on your browser.
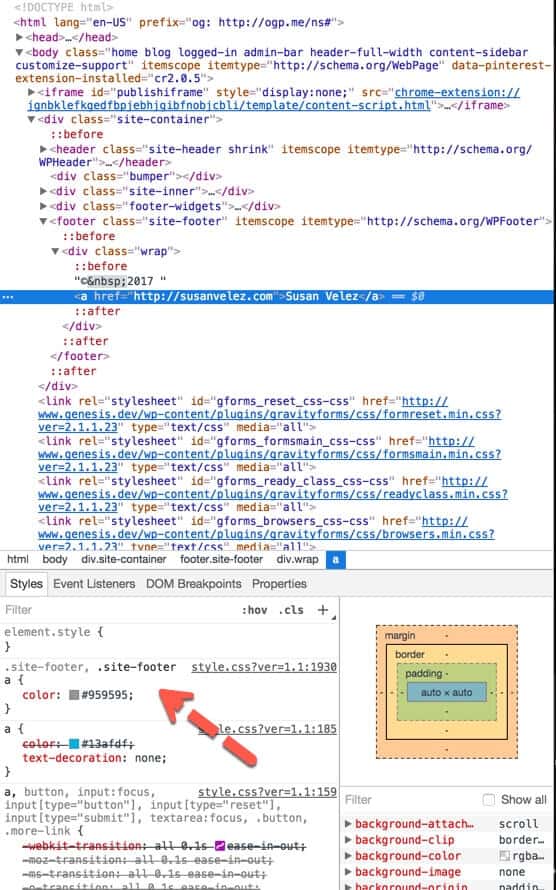
Scroll your cursor up and down the code and as you scroll your cursor the elements will get highlighted.
The Highlighted Element Is What We Want To Change
So if you’re trying to change the footer credits you will be looking for the following CSS code. If you don’t know what hex color to use, here’s a great site you can start with.
This code changes the paragraph text, it will not change the links in the footer.
.site-footer p {
margin-bottom: 0;
color:#FFFF00 !important;
}
This changes the clickable links in the footer credits, I have changed my links to be a white color. You can use this code if you’re using the Genesis Child Theme. I had to use important to get my styles to show up, you may not have to.
.centric-pro-charcoal .site-footer a {
color: #fff !important;
}
If you want to change the color of the links when someone hovers over them, you would use this code.
color: #000;
}
This will change the background color of the site footer to a purple color.
.site-footer {
background-color: #800080;
}
As you can see I am using the Centric Pro Charcoal template. So if you’re using a different layout in the Centric Pro theme, you will be targetting a different layout. The .centric-pro-charcoal will only work if you’re using that layout for your child theme.
How To Tell Which Layout Your Using
Go to Genesis > Theme Settings
Scroll down until you see the color style. This will show you which template you are using. On my demo site I am using the Centric Charcoal layout.

After I’ve made all the changes this is what my site footer looks like with the colors I used above. When I hover over the footer text links they change from a black to a white color.

If you watched the video, you will notice that the colors are different. That’s the great thing about having a self-hosted blog, you can style it to match your brand colors.
Update: I am no longer using the Centric Pro theme for this blog. I’ve made the switch to the Genesis Wellness Pro theme and I absolutely love it. Regardless of which child theme you’re using, making changes to the footer are relatively the same.
Genesis Quick Links
Once you become a Genesis user, it’s important to know how to find the help you need quickly. I’ve put together this list to help you find everything you need quickly.
A Beginner’s Guide: This guide will help you learn the ins and outs of using the Genesis framework. The best part is that it’s free.
Child Themes: Take your time and browse all the available child themes you can choose from. If you’re buying an individual theme, you won’t get access to all their themes.
StudioPress Pro Plus All-Theme Package: You understand that your blog is your business. It’s important for you to have access to over 90 child themes you can use in your business without paying another penny.
Genesis Features: Read through all the features before you make a buying decision. There’s nothing wrong with taking your time to do some research before you make a buying decision.
Visual Hooks Guide: Visually see the hooks in your Genesis theme. (this is for the advanced users or people who want to get more indepth with Genesis)
Genesis Specific Plugins: Created by StudioPress specifically for Genesis. I have used Genesis Simple edits (need to know how to work with plugins)
StudioPress Sites: Use this to get free migration to their managed WordPress hosting.
StudioPress Forums: Need help with a specific child them? Don’t hesitate to ask for help in the forums. I’ve used the forums to get answers to several of my questions.
Become a StudioPress affiliate: Love Genesis so much, make money any time someone uses your link to purchase Genesis.
Hand Picked Articles for You
- How to Choose A WordPress Theme
- 35 Most Important Things You Should Do After Installing WordPress
- Style The Genesis Author Box Without A Plugin
Let me know if you were able to style your own site footer. What colors did you end up going with? Did you find my tutorials easy to follow along with?


Hi Susan,
Well written article. I think every Blogger should know about some CSS styling.
It is beneficial to make your Blog a creative look.
If you know about CSS, then you can direct styling your footer from wordpress theme editor rather than chrome developer tool. Anyway, when you write on any topic, you give a detail information about that topic which helps a Newbie to learn very easily.
Thank you!
Ashutosh Singh
Hello Susan,
Great information over here 🙂
Frankly speaking I am not that much of coding guy, yeah I love to make changes in my wordpress web site, but I am afraid that
what if something goes wrong and I hit the panic button.
I am aware of the Google Chrome web development extension, yeh I have never tried to do much with that.
I am book marking this right now, so that I can dig little deep with this post of yours and get down to it.
Thanks for the share.
Have a great weekend ahead.
Shantanu.
Hi Ashutosh,
I am glad that you enjoyed the article, thanks for taking the time to stop by and comment.
Have a great day 🙂
Susan
Hi Shantanu,
I am not much on coding either, I know a little bit, but that’s about it.
I completely understanding about hitting the panic button, I’ve done that before.
Thanks for taking the time to stop by and comment, have a great day 🙂
Susan
Hi Susan,
Very detailed post anyone could easily understand.
I once learnt about HTML and CSS, infant I created a basic html website.
But had to stop due to other activities.
Would again give it a try and this tutorial doesn’t require much codings either which makes it lot easier for anyone.
I’d give a try soon!
Thanks for the info!
Hi Prosper,
Glad to hear that you’re familiar with CSS and HTML. To tell you the truth, I don’t really use it, unless I need to make some changes on my blog.
I’d rather code something simple in than use a plugin. Of course, I’ve also been known to use a plugin if I don’t know how to do something.
Whatever works to manage your blog. I’m glad that you found the tutorial helpful and easy to follow along with.
Have a great day 🙂
Susan